Note: This article was originally published in 2013. Some steps, commands, or software versions may have changed. Check the current WordPress documentation for the latest information.
In this step-by-step guide, you’ll learn install zend opcache for php and wordpress. WordPress is the world’s most popular content management system (CMS), powering over 40% of all websites on the internet.
Prerequisites
Before you begin, make sure you have:
- WordPress installation (self-hosted)
- Administrator access to WordPress dashboard
- FTP/SFTP or file manager access to server files
How to: Install Zend OpCache for php and WordPress
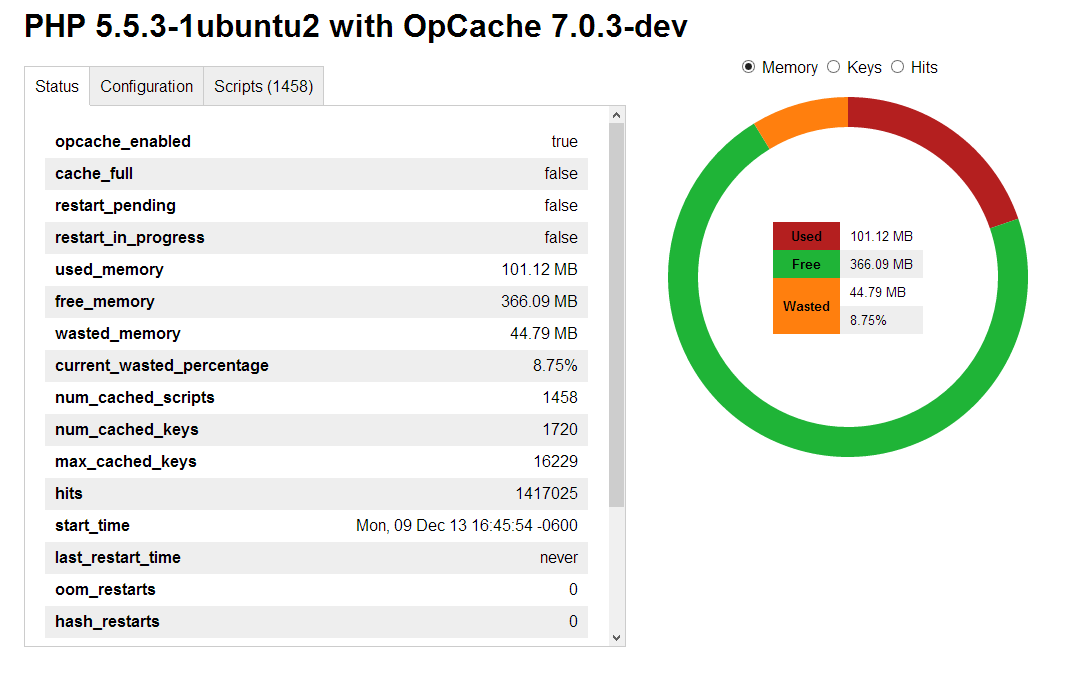
OpCache is a mayor tool to increase the performance of your site. Every time a WordPress page is visited the system needs to compile the php code in order to render the page. OpCache allows you to store those compiled bits in memory and serve them much faster. If used correctly Zend OpCache would identify a change in the physical file and reload the compiled code into the memory cache. I read that it can increase your speed almost 10 fold! In my case I didn’t notice much of a difference but then again maybe my server is just that good ;) But seriously speaking this is a great feature, the server is showing 99.84% cache hit which is really good.
Another great point is that Zend OpCache is included with php starting with version 5.5! Because of that there is no need to install it just activate it and start enjoying the benefits of a faster site:
I. (http://www.php.net “PHP”)’s Zend Opcache recommended configurations:
In your php.ini or /etc/php5/mods-available/opcache.ini update the settings, I suggest increasing the ones bolded: ; configuration for php ZendOpcache module ; priority=05 ; No idea what these do zend_extension=opcache.so ;opcache.consistency_checks=1 ; Determines if Zend OPCache is enabled opcache.enable=1 ; Determines if Zend OPCache is enabled for the CLI version of PHP opcache.enable_cli=1 ; The OPcache shared memory storage size. opcache.memory_consumption=256 ; The amount of memory for interned strings in Mbytes. opcache.interned_strings_buffer=8 ; The maximum number of keys (scripts) in the OPcache hash table. ; Only numbers between 200 and 100000 are allowed. opcache.max_accelerated_files=10000 ; The maximum percentage of “wasted” memory until a restart is scheduled. opcache.max_wasted_percentage=15 ; When this directive is enabled, the OPcache appends the current working ; directory to the script key, thus eliminating possible collisions between ; files with the same name (basename). Disabling the directive improves ; performance, but may break existing applications. ;opcache.use_cwd=1 ; When disabled, you must reset the OPcache manually or restart the ; webserver for changes to the filesystem to take effect. opcache.validate_timestamps=1 ; How often (in seconds) to check file timestamps for changes to the shared ; memory storage allocation. (“1” means validate once per second, but only ; once per request. “0” means always validate) opcache.revalidate_freq=0 ; Enables or disables file search in include_path optimization ;opcache.revalidate_path=0 ; If disabled, all PHPDoc comments are dropped from the code to reduce the ;size of the optimized code. ;opcache.save_comments=1 ; If disabled, PHPDoc comments are not loaded from SHM, so “Doc Comments” ; may be always stored (save_comments=1), but not loaded by applications ; that don’t need them anyway. ;opcache.load_comments=1 ; If enabled, a fast shutdown sequence is used for the accelerated code opcache.fast_shutdown=1 ; Allow file existence override (file_exists, etc.) performance feature. ;opcache.enable_file_override=0 ; A bitmask, where each bit enables or disables the appropriate OPcache ; passes ;opcache.optimization_level=0xffffffff ;opcache.inherited_hack=1 ;opcache.dups_fix=0 ; The location of the OPcache blacklist file (wildcards allowed). ; Each OPcache blacklist file is a text file that holds the names of files ; that should not be accelerated. The file format is to add each filename ; to a new line. The filename may be a full path or just a file prefix ; (i.e., /var/www/x blacklists all the files and directories in /var/www ; that start with ‘x’). Line starting with a ; are ignored (comments). ;opcache.blacklist_filename= ; Allows exclusion of large files from being cached. By default all files ; are cached. ;opcache.max_file_size=0 ; Check the cache checksum each N requests. ; The default value of “0” means that the checks are disabled. ;opcache.consistency_checks=0 ; How long to wait (in seconds) for a scheduled restart to begin if the cache ; is not being accessed. opcache.force_restart_timeout=300 ; OPcache error_log file name. Empty string assumes “stderr”. ;opcache.error_log= ; All OPcache errors go to the Web server log. ; By default, only fatal errors (level 0) or errors (level 1) are logged. ; You can also enable warnings (level 2), info messages (level 3) or ; debug messages (level 4). ;opcache.log_verbosity_level=1 ; Preferred Shared Memory back-end. Leave empty and let the system decide. ;opcache.preferred_memory_model= ; Protect the shared memory from unexpected writing during script execution. ; Useful for internal debugging only. ;opcache.protect_memory=0
II. Web Viewer
I am not sure why but I am crazy about graphs, reports, statistics, etc. Seeing how effective your cache is and the management of system resources is something important. There are several OpCache monitors but I think OpCache-Status by Rasmuf Lerdorf is rather simple to deploy, simple and easy on the eyes.
- Install (https://github.com/rlerdorf/opcache-status)
cd /var/www/OpCache.CloudIngenium.com/wwwroot
wget https://raw.github.com/rlerdorf/opcache-status/master/opcache.php
Screenshot:
(http://kx.cloudingenium.com/wp-content/uploads/sites/3/2013/12/Kx.CloudIngenium.com-OpCache-Status-screenshot-300x190.png)](http://kx.cloudingenium.com/wp-content/uploads/sites/3/2013/12/Kx.CloudIngenium.com-OpCache-Status-screenshot.png)
(http://img.zemanta.com/zemified_e.png?x-id=e5991f73-2683-46a6-874f-5c903e4234e8)](http://www.zemanta.com/?px “Enhanced by Zemanta”)
Summary
You’ve successfully learned install zend opcache for php and wordpress. If you run into any issues, double-check the prerequisites and ensure your WordPress environment is properly configured.
Related Articles
- Changing file permissions and recommendations for WordPress in a Linux system
- How to: Clean your WordPress database from all the empty Yoast WordPress SEO meta data
- Cómo agregar lenguajes adicionales a tu instalación de Wordpress - Multisitio Multired localización
- How to: Connect to a MySql server using SSL from a WordPress Site